Preflight
Preflighting the Airmaster is standard high-wing taildragger. The airplane is fairly simple so there's nothing really special about the preflight procedure. Since the engine is a radial, you need to take care to check that there is no hydraulic lock from oil draining into the cylinders. This is done by manually turning the engine through several rotations and feeling for blocked cylinders. This procedure will usually cause oil to drain out, so it is important to position the nose into the wind or else the oil will often blow all over your shoes.
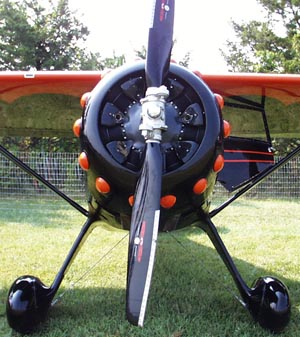 The Aeromatic prop is variable pitch but self-regulating, and unlike a modern
constant speed propeller you can easily change the pitch of the Aeromatic blades
on the ground by just twisting the blade. The Aeromatic also mounts the
prop blades canted off from the straight radial line of the prop hub. This
mounting is necessary to achieve the automatic speed and pitch regulation of the
Aeromatic propeller, but it sometimes causes some
concerns amongst bystanders who have never seen an Aeromatic before. The
photo shows an example Aeromatic mounted on a Monocoupe.
The Aeromatic prop is variable pitch but self-regulating, and unlike a modern
constant speed propeller you can easily change the pitch of the Aeromatic blades
on the ground by just twisting the blade. The Aeromatic also mounts the
prop blades canted off from the straight radial line of the prop hub. This
mounting is necessary to achieve the automatic speed and pitch regulation of the
Aeromatic propeller, but it sometimes causes some
concerns amongst bystanders who have never seen an Aeromatic before. The
photo shows an example Aeromatic mounted on a Monocoupe.
Startup
The magnetos on Warner engines have neither impulse couplings or a booster coil to help with cranking. Instead, the VMN7 magnetos have a manual ignition retard control. This makes the starting procedure a little different:
- Pull out the ignition retard control about 1/2".
- Turn on the primer valve, prime about 4 strokes, and turn off the primer valve. No primer is necessary when the engine is hot.
- Engage the parking brake by pulling back on the lever by the pilot's left foot. The lever will lock in the on position.
- Turn on the master switch, which is located on a box facing downward underneath the left side of the control panel. You have to feel for it, and be careful to avoid stabbing your fingers on sharp edges.
- Flip on the magnetos, which are two toggle switches on the left side of the panel. Note that the down switch position is on, the up switch position is off.
- Press and hold the starter button. The engine is relatively hard to start when hot, and if you have the ignition retard too far out or too far in it won't go. I slowly push the retard control in while cranking. It will usually fire at the right position. If the engine kicks back, you don't have the retard level pulled out far enough. There's a very fine line between too far and not enough.
- After the engine catches and is running, push the ignition retard control all the way in (full advance). Failure to do this means the engine won't make full power and your takeoff will likely be exciting.
If you haven't flown for a day or so, engine start is usually accompanied by prolific volumes of oil and smoke. The oil will end up both on the ramp and splattered down the side of the airplane. Folks should not stand behind the airplane when starting or they will likely be splattered too.
There's nothing like the radial engine sound. Here's a Jacobs radial being started.
Taxiing
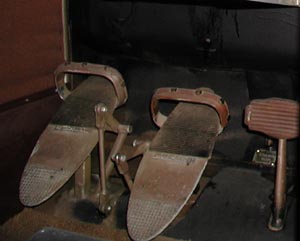 Taxiing the Airmaster takes some getting used to. It has hydraulic heel brakes which are somewhat
awkwardly set up, and the only steering is the brake since the tailwheel is
either locked straight or free-swivel. To actuate the brakes you must push
down with your heels, but also almost lift up with the toes. The rudder
pedals have a leather strap across the toes to assist in this process.
Taxiing the Airmaster takes some getting used to. It has hydraulic heel brakes which are somewhat
awkwardly set up, and the only steering is the brake since the tailwheel is
either locked straight or free-swivel. To actuate the brakes you must push
down with your heels, but also almost lift up with the toes. The rudder
pedals have a leather strap across the toes to assist in this process.
It takes about 1500 RPM to get moving, and there's not a lot of steering that you can do from a start. Once you're moving then minor brake corrections will keep you going straight, but you really have to pay attention even when taxiing in this plane when the tailwheel is unlocked. Leading turns with rudder and power helps, but it takes practice to stay more or less straight.
There is a tailwheel lock that is actuated by a small lever on the pilot's seat leg. I have found that this is not worth using while taxiing in low-moderate winds. In high winds the lock is necessary to have any chance of tracking straight. There is enough play in the tailwheel to have a little bit of steering even when locked, but only enough to stay on a straight taxiway, not enough to do any maneuvering.
Flying
In flight the Airmaster is very solid feeling. It has a relatively slow roll rate and medium roll stick force, and a high pitch stick force. Trim is important in the pattern and on takeoff. The rudder is light, but it is easy to feel when the plane is uncoordinated.
The left hand flies the stick because the throttle is a center-mounted push-pull lever, and that takes a little getting used to. Stick forces are high at low speeds, so if you don't have the plane trimmed right you can need two hands on the stick during rotation or a go-around.
Approach stalls give a noticeable but short-lived buffet with a sharp break. There's no stall horn but the vent tubes in the wing roots provide a wailing noise that warns of impending stall. Departure stalls will drop a wing sharply and the plane feels like it wants to go over into a spin. Gar Williams says that if you stall without full coordination it will spin very easily, and the spin winds up as fast as some aerobatic aircraft. The moral of that story is to stay coordinated.
Takeoffs are easy. After lining up on the runway, reach down and flip the tailwheel lock to the straight-and-locked position (lever down). The tail comes up easily and with full power the rudder is very effective. Rotation is about 65, and a stabilized climb at 90 provides a small amount of forward visibility over the nose. With the Aeromatic prop, indicated RPM is about 2240 at full power. The engine is limited to one minute continuous full throttle, so at 500 feet AGL the throttle is pulled back to 2100 RPM indicated, which is maximum continuous power. There is no propeller control lever with the Aeromatic.
Upon leveling off, the speed builds up slowly to 145 to 150 mph. As the ship speeds up the Aeromatic regulates the propeller to a higher pitch setting. The throttle is pulled back to about 1900 RPM, which is cruise power. At this setting the manifold pressure at low altitudes will be in the 22" range, although it varies a little depending on speed, altitude and temperature because of the Aeromatic propeller regulation design relies on aerodynamic forces to regulate propeller pitch.
There is a fuel selector and my Airmaster has three fuel tanks - left, right and auxiliary. The aux tank is located on the cabin ceiling behind the wing spar carrythrough, and it is plumbed into the left tank. You don't have to worry much about fuel management since the selector has a both position. With full tanks the plane has about 5 hours of range. The fuel gauge is even functional, although its operation is unique. There is a single gauge and two round doorbell buttons on the panel for left and right tank. Press and hold the button of the tank that you wish to check the level of, and the gauge indicator will slowly rise to the right level. It takes about 30 seconds. Once you get the reading it is then required that you release the button and let the gauge return to the zero position before reading the other tank. The return step takes about 45 seconds.
In the descent you don't need to worry about overspeeding because the propeller will continue to regulate engine RPM at about 1950 RPM. Slowing down takes a little while, though, so some preparation for the pattern is required. I usually pull back to about 1500 RPM, and the airplane will settle into a 90 MPH indicated airspeed. This is a good flap extension speed. The flaps are electrically driven and come out slowly. The flaps don't have much lift effect but do help with drag for slowing down. There's a slight pitch change when flaps extend.
To being the descent pull back to about 1200 RPM, and settle into a 80 MPH airspeed. I aim for coming over the fence at 70 and settling on at about 60. The approach requires a fair bit of nose down attitude and flattens out on short final. This is quite different from my Bellanca which requires a nose-up attitude to maintain airspeed and descend at the same time, so the Airmaster is taking some getting used to. Once I have the plane dialed in I think that the Airmaster will perform a steep power-off approach with no problems.
The airplane wheel lands reasonably well, although as with most wheel landings you need to make a point of pinning the plane on after touchdown to avoid a bounce. I think the airplane is best in a three point attitude and I will be transitioning to a three point technique after trying it out on grass. It is important to remind yourself on short final about the heel brakes, because the toe-brake pilot's natural inclination is to put weight on the heels. Unlike a Citabria where you have a separate pedal to apply brakes, with the Airmaster pressure on the heel of the rudder pedal actuates the brakes. You need to keep the rudder pressure on the toes with the Cessna.
Rollout is short and pretty tame. To turn off the runway you have to reach down and unlock the tailwheel by pulling the lever up. In a crosswind this will cause a swerve as the lock is released unless you're prepared for it with brake. This is a good reminder to fly the plane all the way back to the hangar, and impatient tower controllers need to give you time to stop on the runway if necessary after the rollout.