For the first two years I owned my Bellanca I watched it ride lower and lower on the main landing gear springs. Changing the main landing gear springs solved the problem. You can tell by looking at the amount of chromed strut showing when the airplane is sitting statically on the ground. The proper amount seems to be about 1.25 to 1.5 inches. You can also look at the welded stop on the scissors link. If the stop is close to bottoming, you should think about changing your springs.
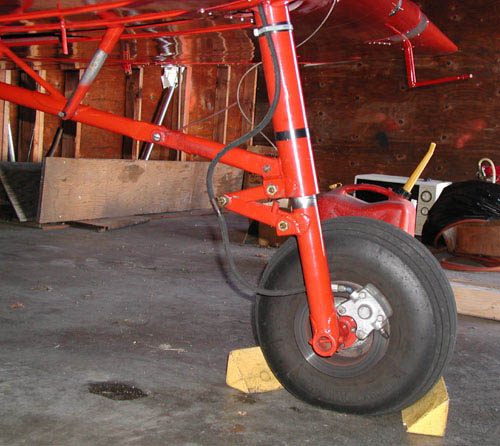
For reference, here's an overall look at the left landing gear leg, taken shooting outboard towards the wingtip:
Bellanca Incorporated sells replacement springs at $271.25 for each spring. The part number for my aircraft is 19402-2, which should be the same as the spring used in 260s and early Vikings.
You could probably have your own springs manufactured for a lot less money under the FAA owner manufactured parts rule. The specifications for the springs are as follows, information obtained from Bellanca Inc:
- 6.25" extended length, 12 coils
- Constant rate spring
- 5/16" diameter wire, AMS 6451A material
The spring OD is 1 9/16" based on observation of four different springs. The specs from Bellanca did not include the outside diameter. The specs also did not include a force specification.
There's also some prep on the airframe. Removal of the wheels makes the job easier because it reduces the mass of the lower gear strut. I also removed the brake caliper and let it dangle to avoid unhooking the hose and having to refill and bleed the brakes later. You'll also need to remove the fairing around the gear strut pivot point on the underside of the wing. Remove the cotter key and the nut on the lower bolt of the nutcracker or scissors link assembly. This bolt also holds the end of the gear strut suck-up cable, which will need to be removed before the gear leg can be extracted. Lastly, remove the fluid filler plug located on the outboard side of the gear leg.
Once prepped, jack the airplane. Using the hand pump, raise the landing gear about three quarters of the way up. Completely remove the lower scissors link bolt. Then using a socket or double-offset wrench remove the nut located on the upper surface of the gear strut, which will be exposed by partially retracting the leg. You may need to jiggle the lower gear strut around and/or apply upward pressure to the lower gear strut in order to prevent the stud and inner strut assembly that this nut is threaded onto from rotating. There is a leather grease seal on the bottom of the upper gear strut which should be removed. Once the upper nut is off and the grease seal are removed, the entire lower gear strut and the inner strut assembly can be extracted from the upper gear leg by pulling out from below.
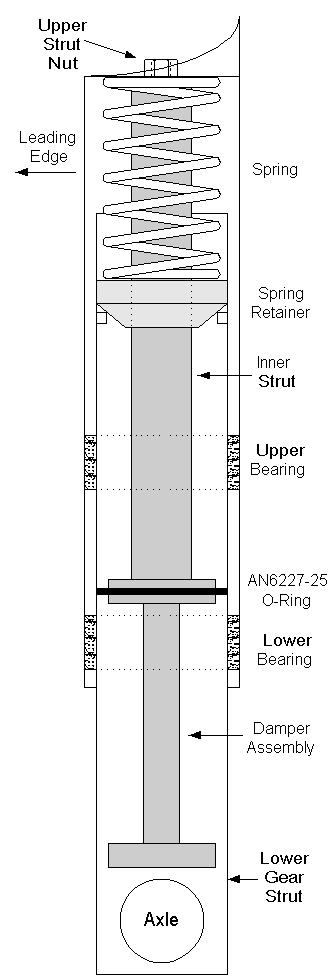
Figure 1 - Landing Gear Strut Diagram
Figure 1 shows the components of the main landing gear struts. The gear spring itself just sits at the top of this assembly, so to replace pull the old spring out and insert the new spring into the top of the lower gear strut, and reinstall. Since my gear leg was leaking damper fluid, I pulled the inner strut and damper assembly out of the top of the lower gear strut to replace the O-ring. The spring retainer rides on a ridge in the lower gear strut, and it will simply fall out when the strut is turned upside down. Below the O-ring is the damper assembly filled with fluid, so be careful when removing the assembly not to spill fluid everywhere. The damper and inner strut are rigidly attached to the upper gear strut, and the lower gear strut slides between the inner strut and the upper gear leg. While everything is apart clean and inspect for cracks and wear.
With the O-ring replaced and the damper and strut assemblies cleaned, reassemble by putting the inner strut back into the lower strut, insert the spring retainer, and then put the new spring atop the entire assembly. I applied grease to the spring and spring retainer, and also packed the upper gear strut with grease between the two bearings that the lower gear strut rides in. Reinsert the lower strut assembly into the upper strut, and reinstall the upper nut. Reinstall the upper strut grease seal and the nutcracker bolt and nut. Lower the gear leg with the emergency hand pump. Brakes, wheels, cotter keys follow easily, and the last step is refilling the damper with 5606 (red) fluid to the level of the filler plug when the aircraft is sitting statically. Reinstall the filler plug with safety wire.
The springs removed from the aircraft had definitely collapsed as compared to new springs. Figure 2 shows the two springs that were removed from the aircraft. Notice the difference in lengths. The new replacement springs were 1/4 inch longer than the longer spring in the photograph.

Figure 2 - Landing Gear Springs
After spring replacement the landing gear is no longer riding on the stops and I have about one and one half inches of chrome showing in the static position. As an added bonus the strut no longer leaks fluid.