2.3 Mechanical Installation
2.3.1 Mounting Tray
The AT 150 is supplied with a mounting tray which is designed to mount behind the aircraft instrument panel using four number 6 screws. Figure 2-2 provides a detailed drawing of the tray and the parts of the Installation Kit. This figure also provides all the necessary dimensions for the panel cutout as well as dimensions for mounting brackets locations. A full scale cutout template is also provided.
Mounting brackets (4) are not supplied due to the wide range in mounting requirements. Suitable mounting brackets may be fabricated from ordinary sheet metal or angle stock. To ensure a sturdy mount, rear support for the unit should be provided.
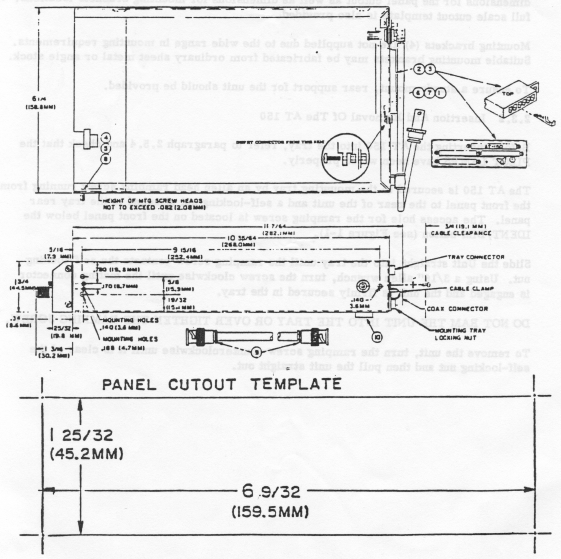
Figure 2-2 - Installation Diagram
2.3.2 Insertion And Removal Of The AT 150
Before inserting the AT 150 into the tray, refer to paragraph 2.5.4 and check that the PILOT LAMPS have been wired properly.
The AT 150 is secured to the mounting tray by an Allen head ramping screw running from the front panel to the rear of the unit and a self-locking nut attached to the tray rear panel. The access hole for the ramping screw is located on the front panel below the IDENT/DIM button (see Figure 1-1).
Slide the Unit straight into the tray until the ramping screw contacts the self-locking nut. Using a 3/16" Allen wrench, turn the screw clockwise until the mating connector is engaged and the unit is firmly secured In the tray.
Do not ram the unit into the tray or over tighten the ramping screw.
To remove the unit, turn the ramping screw counterclockwise until it is clear of the self-locking nut and then pull the unit straight out.