|
Fairchild 22 Blasting Booth |
| Home > Williams Aircraft Collection > Fairchild 22 > Restoration > Log > Blasting Booth | |
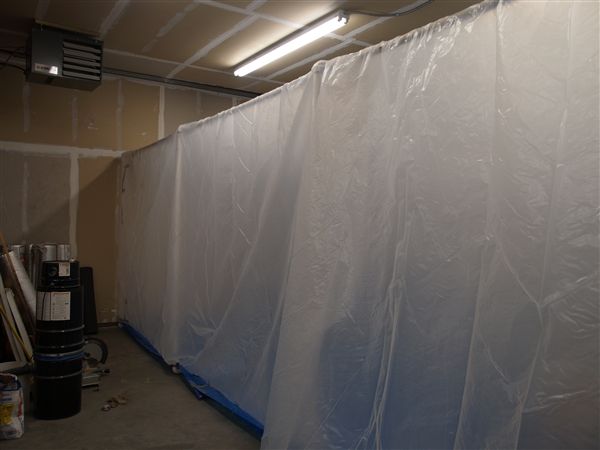
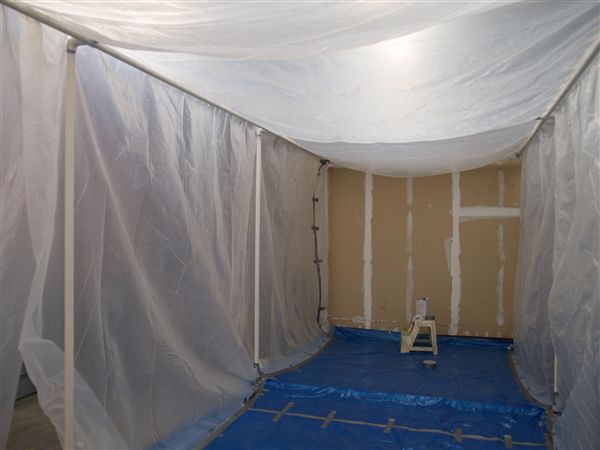
Fuselage TubularsMany aircraft of the 1930s are constructed using a welded steel tube fuselage. The Fairchild 22 is very standard in this respect, with the exception that the tubes are square instead of the more normal round tubes - this was a Fairchild peculiarity. Over time, the "tubulars" or frames generally hold up well if they've been protected with paint and they were sealed with "tube oil". Tube oil is an oil that penetrates and "creeps" via surface tension to coat a surface, and it is used on the inside of welded frames to prevent corrosion. Even so, water dripping into the inside of planes often pools inside the fabric covering, especially at low points such as the tailcone, and can cause even the most well protected steel to rust. Sometimes older aircraft have the tubes in the tail section almost completely rusted through. Another potential danger for steel tubes is cracks. Steel tubing can fatigue and crack due to load or stress concentrators that can be caused by damage or poor construction techniques (e.g. bad welds, tooling marks and scratches, poor deburring, etc). Cracks are hard to find as they can be hairline thin, and old paint generally obscures cracks. Thus to properly inspect the frame and determine its condition, old paint and any old corrosion must be removed. Paint can be stripped chemically but that's extremely messy and involves noxious chemicals, and it doesn't address removal of rust. Most of the time a better process is to abrasive blast the fuselage using an air blast with glass beads. The abrasive blast does very little damage to the steel, but removes paint and rust quickly. It also leaves the underlying steel in a beautiful "fresh" condition that after cleaning is perfect for sealing with a primer coat. Bead blasting is relatively slow compared to other abrasive choices, such as sand or aluminum oxide, but glass beads leave a very fine satin finish and do not take off significant amounts of the base steel. Other media types, while working faster, can damage the steel if you're not careful. Since the tubing is thin to begin with (e.g. 0.040" or thinner) even a little material loss can be significant. A Walk-In Blasting BoothAlthough less messy than chemical stripping, bead blasting is itself not the cleanest process. To blast a frame the size of a fuselage requires a large sealed booth, a blasting tank and nozzle, a fresh air hood, and sufficient compressed air to keep up with the blaster. I built my blasting booth to be a free-standing unit, although it is not readily moveable once assembled at a certain location. The booth frame is made out of 1.25" Schedule 40 (white) plastic water pipe and fittings available from home improvement stores. I built my booth to be 8' tall by just over 8' wide, and 24' long, which fits the fuselage dimensions of 6' x 19' with room to walk around. Here's the external view where you can see the frame of PVC pipe.
To seal the booth I used blue plastic tarps on the floor for extra abrasion resistance, and 6 mil clear plastic sheets on the side and top, all sealed with high strength duct tape. One end is left open for loading and human operator entry.
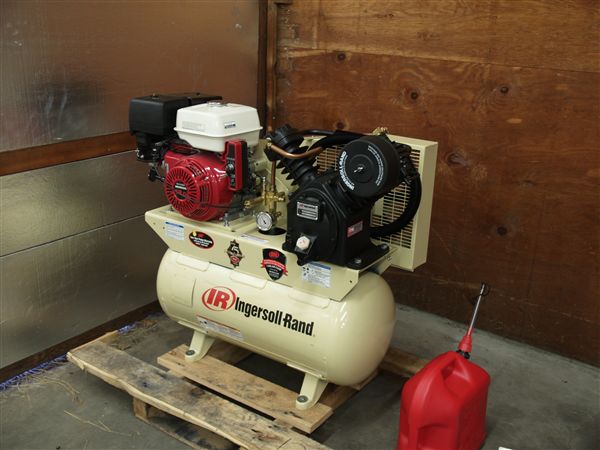
You might think you can save time by not completely sealing every seam, e.g. along the roof of the booth. I would recommend against this, as when actually blasting the beads will go everywhere. 90 psi air and bead streams shoot a long way and when doing an irregular surface the gun will be aimed at all different angles, including straight up. If you don't seal the roof or sides you will get beads leaking out. In addition to the booth you're also going to need the following: High Volume AirTo work with any speed you'll need a 7 or more HP compressor, preferably two stage with 14 or more CFM at 100 psi. If you have a single stage 5 HP usually you'll get about 8 to 9 CFM at 90 psi, which is the bare minimum. Less than that and you'll end up having to wait on your compressor a lot. The little oil-less compressors that you can get in home and garden shops won't cut it as they put out even less air for the HP than an oiled compressor unit. Make sure your compressor can take high duty cycles or you may well burn it up during your blasting project. For blasting you'll want to have a water filter on the line. You should also consider using large diameter feed hose if you have a 2 stage higher output compressor, as you'll get less pressure drop and can probably use a larger blasting nozzle orifice (larger orifice = faster blasting). Follow the blasting tanks' manufacturer's recommendations, but a single stage 5HP compressor will generally work with a 7/64" nozzle, and a dual stage higher output you can use a 1/8" nozzle. My hangar unfortunately doesn't have very good electrical power feeds. I can barely run a 5HP electric single stage compressor without blowing breakers. Rather than tear up a taxiway to get high current electrical service, I've gotten an Ingersoll-Rand gasoline powered "portable" compressor meant for truck mounting. Although loud, it is a fine unit that has more than enough power. This is the Model 2475 13 HP Honda-powered unit.
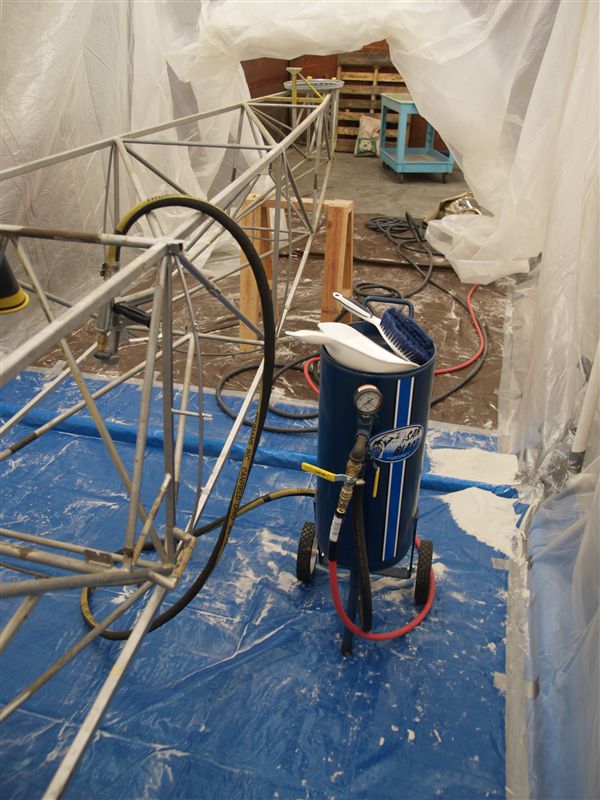
Blasting TankFor full booth work get a portable blasting tank. The tanks are filled with the blasting media and are designed to be pressurized by the main air supply. There's a "gun" with a calibrated nozzle and valve system to control the actual blasting. I use a San-Blast system, which I heartily recommend, but San-Blast is no longer in business. The former makers of San-Blast recommend Brut Manufacturing. I haven't dealt with Brut yet, but expect to. Their model 99H is the equivalent to the tank that I use. Here's the rig I've got, with the "38 special" gun.
There are cheaper tanks available and a tank could probably be constructed from scratch pretty easily. The fittings are just plumbing fittings, and the only part you'd really want to buy is the gun assembly. On the other hand I'd rather be working on aircraft than on blasting equipment, and secondly since the tank is pressured to 100 psi it'll do a lot of damage if it should fail. I'd rather have a tank professionally welded vs. something I did with my meager welding skills! Blasting MediaI've been using AC grade glass bead blasting media. It is on the fine side but it leaves a beautiful smooth satin finish. If you're in a hurry or have well baked on paint, I'd recommend a glass bead grade that's a little more aggressive, such as #6. I'm getting bead media in 50 lb bags. In the booth have a broom, dustpan, hand brush, and sifting screen handy for recycling bead media as it accumulates on the floor of the booth. The sifting screen will keep out the biggest bits of trash coming off the frame, as otherwise that trash will clog your blasting tank. Personal ProtectionDo not use a blasting booth unless you have a full face mask respirator and fresh air respirator! Glass bead dust will do permanent damage, so don't try to pinch pennies here. Bullard sells a full line of air pumps and hoods, although they're on the pricey side. You can probably find other suppliers at your local abrasive shop. I'm using a Bullard light duty full face hood and single-person continuous flow air pump. You'll also want some heavy rubber gloves to protect your hands while holding onto the gun. Abrasive will bounce off the blasted surface and will sting and cut unprotected flesh if you don't have gloves on. Lastly, wear clothing you're not attached to as they will get very dusty and covered in blasting media. Using the booth is like going to the beach, finding the light powdery "white sand" area up by the dunes, and then throwing yourself to the ground and rolling around for a while. The more you blast the more the dust piles up, to the point where you will be able to beat off dust in clouds when you walk out of the booth after a blasting session. ResultsIs it worth it? Well if you wanted to save money or time, take the frame to a professional blasting company with a permanent booth and let them do it. In the Seattle area, Machinists Inc. near Boeing Field is a good choice. They'll get it done faster and probably for less monetary investment. The downside is that most of these companies are used to working as quickly as possible on thick steel semi truck and trailer frames, and they tend to give the same "ok boys, blast away" treatment to your frame. Since your frame is a lot more delicate and made of thinner material, you may find that it comes back with a lot of material eaten away. Therefore I prefer to control the pace myself even though it takes a long time. This also offers an opportunity for detailed inspection of the tubular for cracks and imperfections that need repair. Here's a picture of a cluster on the Fairchild that has been partially blasted. The paint on my frame is silver, which makes it harder to see the difference between old vs. new, but notice the smooth finish of the cluster vs. the many ugly coats of paint previously present (there were at least 4 coats on my frame).
One downside to blasting is that once you remove the paint, the fresh steel surface will flash-rust just from atmospheric moisture. Therefore you should prime it within a few hours to guard against corrosion, lest you need to blast all over again. Since painting in the booth is a bad idea due to the dust level, the frame has to be moved outside of the booth, de-dusted, and painted. Some folks powder-coat frames instead of painting. This is a personal choice, but I'm a fan of epoxy priming. My reasons are:
|
||